

How did you use media technologies in the construction, research and planning and evaluation stages?
Click the button to be take to the section you have selected.

Construction
This section is split into camera, editing and sound.
Camera
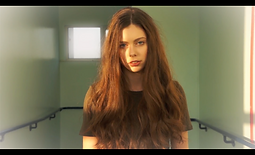
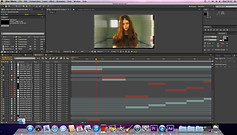
THIS IMAGE IS OF THE BEGINNING OF THE PORTRAIT SHOT, WHERE CLARY HAS HER BREAK DOWN. THE POSITION AND ANGLE OF THE CAMERA WAS PUT HERE TO ENHANCE THE PAIN THAT WOULD BE PRESENTED ON CLARY'S FACE.

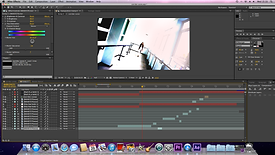
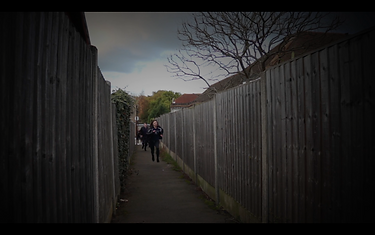
THE IMAGE SHOWS THE TILT WE USED ON THE CAMERA TO FILM THE CORRIDOR SCENE. THIS HELPED US TO PRESENT THE HAUNTING AND CREEPY ATMOSPHERE WE WANTED.
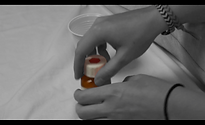
We used a Sony camera to film and record all of the shots and voiceovers used within the trailer. The camera worked very well in producing the quality and focus that we wanted within each shot. This is seen within the scene of Clary at the mental hospital because we used this camera to film the portraits of her having her melt down. The camera was able to capture the emotional detail on her face as well as emphasise the shadows that were defined by the beams of light coming through the window. Furthermore, we even tilted the camera for when Clary would slowly walk down the corridor in the hospital. This created a really distorted and uncomfortable scene.In addition, the added portable microphone that attached to the top of the camera gave us a much better sound quality when we had to record dialogue for the film. This helped us when producing sound effects because we used the microphone to record whispers that were inside our character’s head. The microphone allowed for use to get clean voices while we played around with the pitch and length of each whisper to present echoing and haunting voices. This worked really well with the sinister and haunting atmosphere we wanted to create from the portrait shots, where Clary is having her melt down. However, we did have trouble when battling the elements to pick up on the dialogue within certain scenes because of the distance between the camera and the actor prevented a clean and clear recording of this. So we used an iPhone, that was placed in the pocket of our actor, to record the dialogue in this scene and this work effectively because we were able to gain an additional and more concrete sound of the character’s line without having to re-film takes.We also used a Panasonic camera to film the scene where we poured pills inside of the cup. This was a challenge at first because we had to position the camera at the bottom of the cup so that the camera could see through the centre of the cup. Then it became even harder because we had to angle to camera perfectly so that when the medication pours into the cup you are still able to see Clary’s face peering over the top. As hard as it was to film this shot, the result was worth it because we created an impressive point of view shot.
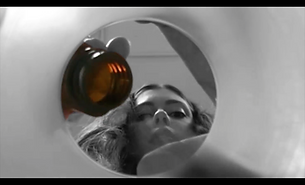
THIS IMAGE IS OF WHEN CLARY POURED THE MEDICATION INTO THE CUP. THE ANGLE WAS CHOSEN TO PRESENT A TRAPPED ENVIRONMENT WHERE CLARY FEELS AS IF SHE IS DROWNING IN THE MEDICATION.
Editing
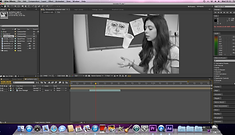
This section of our post-production took the most time because we had to use a wide range of technology to edit each clip. We use Adobe Premier Pro to place all the clips in order and rearrange when needed too. This was the most used because we firstly decided on an order for our trailer, which kept on being adapted through audience feedback. Our rough cut survey is linked below and will give examples of the clips we had to move around. Then once everything was where we wanted it to be, we then had to edit each clips to complement its surrounding clips and enhance the key features within the narrative. This is shown through the beginning scenes of the trailer, when we used a colour isolation edit to separate one room into black and white colours while the rest of the scenes outside that room were still in colour. From this, it emphasises the isolated and depressing environment our character is being held in and instantly makes the audience think that something isn’t right. Premier pro also helped us to edit the sound of the voiceovers and music in order to create subtle blends when merging the soundtrack, to get a smooth transition, as well as allowing us to adjust the volume level of the music at different points so that the dialogue and voiceovers could be hear by the audience. These tools became very useful for when we wanted to layer up the whispers and scream sound effects for the portrait scene, when Clary was having a meltdown. They enabled us to increase the tone and volume of specific whispers so that the audience could hear the emphasise on specific words and understand their meanings towards the narrative of the film.
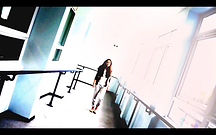
Adobe After effects was the main software that we used for editing the each shot. We used a variety of edits to present the complexities of our film narrative. The layer of after effects can become a little confusing at times, however as I am familiar with this app I have been able to advance further in my after effect skills by using more complex and interesting edits for our trailer. Firstly, I used a cinematic effect to saturate most of the shots shown in the trailer. I did this to clearly show the difference between the present shots of the main character (Clary) in the hospital, which would be seen in high key lighting, and the past/future shots of Clary for when she learns the truth about everything and escapes from the hospital, which is shown through the saturation edits. We also used the track motion tool of after effects for the levitation edit because we needed to layer the cup on top of the original shot and we needed to track the movement of the cup so that the layers could sync up together. This proved to be a very useful and effect tool because it made the edit easier for us to complete. In addition, I was also able to use the particle simulator effect, which was a very complicated tool, for the title scene. The background shot would present a flame growing out of the main character’s, Clary’s, hands. I really enjoyed being able to develop my knowledge of this effect through after effects and it provided us with the ability to customise our own flame because of the range of setting you could change to produce a flame that matches the themes and lighting of the shot. This tool enabled me to change the shape, movement and growth rate of the flame so that I was able to produce the right style of flame to complement our title and I could change the colour as the flame grew so that the yellow and red tones could darken as the flame grew taller. I believe that this is one of the best edits within our trailer because the audience gain a better understanding of the narrative when they see this shot (because it sums up the films storyline perfectly) and it also creates an excitement in the atmosphere. Furthermore, we could create interesting and unique transitions on after effects. We used a glitch effect to enhance the emotion and fear within the portrait scenes of where Clary had her meltdown. The glitch effects enabled a fragmented but smooth transition between the change in colour tint edits on theses shots and was able to increase the tension within the atmosphere.
Sound

For the soundtrack in the trailer we used GarageBand. This app allowed us to create our own music through loops. We were able to select the specific loops we wanted and layer them up to create our own sound that would complement different scenes within the trailer. I was familiar with the process of GarageBand because I had created the majority of the music last year, meaning I had a good understanding of what kind of loops we wanted to select and layer in order to sync well with the high action scenes. There are a group of bass and drum loops that worked perfectly for the soundtrack of these scenes because they had the fast heavy beat that would build the tension and thrill within the audience. However, the loops provided on GarageBand were limiting to our production this year because of the distorted scenes we had incorporated. This meant we were looking for lighter pitches that would layer up to create creepy appearance when played alongside the corridor scene. Alternatively, we used a section from a track be Stephen Scott. GarageBand allowed us to layer up more loops to build upon the section of track we had selected to create the fragmented track that emphasises the isolation and sinister environment we made for the corridor scenes.

Research and planning
This section is split into two parts, the first is planning and the second is research.
Research
In the research stages, I used YouTube to inspire the type of edits I would use in the trailer. On this website I was able to learn how to use the particle simulator for the fire rising from Clary’s hands, create the saturated effect, produce a glitch transition, isolate the colours of a shot, levitate the cup in the air, etc. The majority of the edits used within the production of the trailer was found and developed from researching these edits on YouTube, such as the levitation edit, glitch transition, colour isolation, etc. However, I had to be careful with the tutorial I chose because some tutorials used a different version of the software we had so when I came to do the edit the tutorial would have additional features that were necessary for the edit that I didn’t have access to on the software we were using. This happened when I tried to edit in a soul effect for a tutorial I had seen on YouTube and I only realised that I wasn’t able to achieve the edit because the tool that they used wasn’t available on the version of after effects we had access to. This meant we had to compromise and continue to research until we found another edit that was achievable and would complement the trailer and shots we had.
I also used YouTube for research on trailers. This helped us analysis the specific features and understand the different expectation used for creating your own trailer. The research from the trailer really influenced the way we presented our characters and deigned the title of the film. It also helped us to develop upon original sketches and designs we made at the beginning of the planning stage. We had to adapt and change multiple plans because they became problematic to the quality of our trailer when we had to produce the plans we had made, therefore when this happened we would turn back to our research and us it to inspire more ideas that would work better that the failed ones. This is clearly seen when we had to rewrite the shooting script because when producing the trailer we came to realise that some of the shots and the way we ordered them did not work with the flow of the trailer and our audience feedback definitely influenced the new order as well as what we had learnt from the previous trailers we had analysed.
i used google images for The ancillary task research of poster and magazines so that i could access and analyse previous front covers of Empire and total film as well as see the latest poster releases of films. Google images allowed me to experience the fine detail and styles that the poster and fRont cover of magazines were using. tHIS HELPED ME IDENTIFY THE SPECIFIC FEATURES NEEDED WHEN CREATING MY OWN POSTER AND MAGAZINE FRONT COVER AND THE RESEARCH IS PRESENTED IN THE POWERpOINTS BELOW. Click on them to be taken to the blog, where you can look at my analysis.
Once I had done the research, I used PowerPoint, Prezi and Blogger to present my thoughts and ideas towards what we should and shouldn’t use within the production of the trailer. This can be seen on the blog:
examples of how i used prezi and powerpoint to present my research:
CLICK AN IMAGE TO VIEW ON OUR BLOG.

Planning
In the planning stages, I used software’s such as PowerPoint, Prezi and Word to present my final designs and ideas for different sections of the trailer and the ancillary tasks.
PowerPoint really helped me to construct and layout my ideas thoughtfully so that when I came to the final product I knew exactly what I had done and what next I had to do to achieve the final product.
Word allowed me to create storyboard, which I sketched on to show the beginning plans of the shots we wanted to use within the trailer. This gave me a clear idea of the types of shots and angles I wanted to present within the trailer. From this, we could then create a shooting script, on word, that would go into more depth on what we wanted from each shot.
However, with PowerPoint and Word you have to upload the presentations onto Author Stream and then embed them onto Blogger. This is because PowerPoint and Word are not online documents so when they are uploaded online through Author Stream they can then be accessed and viewed through Blogger.
Prezi is an online software that allows you create an interactive slideshow, where you can add internet links and videos to the slides. It allowed me to really explain why we came up with these certain ideas and how we were inspired by scenes in other films. I really enjoyed making my Prezi’s because you had less limitations on what you could use and had create and unique templates to match the themes of your presentation. Due to the fact that this programme was already online, when uploading to blogger it was easy and simple to do as you would just copy the embedding code and paste it into the HTLM on blogger.
examples of my PLANNING POSTS:
CLICK AN IMAGE TO VIEW ON OUR BLOG.


Evaluation
This section is split into Wix, blgger, youtube and vimeo.

Wix
I used Wix to create this website for my evaluation. This application allows you to produce your own website using a variety of different tools and styles to choose from. The template I chose was one that would allow for my audience to have easy access to each page and to be visual pleasing so that they can be intrigued by the content on each page. My website is able to add video and web address link to photos in order to create a more engaging and interesting evaluation. In the challenge part of question 1, on my website, I was able to answer the question via video and place it onto the page so that my answer could become more personal and direct to the viewer. This creates a better understanding for the viewer as well because they are able to see the creator of the website and feel more connected to them. My answers to all of the different question were able to be presented and explained through previous work that I had done on my blog, so that the viewer isn’t restricted to one form of explanation towards a particular decision we made towards the creation of our film and can look further into the details by the additional links.
Overall, I really like my website and the way I was able to really experiment with my own style so that it could be more personal to me and the trailer that my production company had produced. It enabled me to create easy access to a wide variety of materials that weren’t just on the website and enhanced the way my audience could experience my evaluation of the trailer.
Blogger
With blogger I was able to create the blog for our production company, so that all the research and planning towards the production of the film could be stored and presented in one place. This became very handy within the evaluation stages because then I was able to easy link and image or specific presentation, that linked to the question, to my evaluation website so that the viewer was able to quickly and simply access any of the files if they wished to do so. My presentations could then become more interactive for the viewer on my website.
Youtube and vimeo
YouTube and Vimeo also allowed me to create a more interactive and engaging website because this enable me to link any tutorial that had helped within the editing stages of the production to the website so that the viewer could see first-hand the level of difficulty with some of the edits. Furthermore, I was able to upload my own video’s for one of the question where I explained my answer to them through the video. From this, my audience will be gain more knowledge and understanding of my answer because I am directly speaking to them. This also allows for them to choose their preference of viewing because they can choose between video or text. Finally, YouTube was used to upload the trailer and therefore we were able to have it displayed multiple times throughout the website, so that the viewer would have easy access to it when every they wanted to watch it.

